DIMENSIONING IETHODS
 7 апреля, 2014
  Oleg Maloletnikov
There are two basic methods for dimensioning a part: conventional dimensioning and baseline dimensioning.
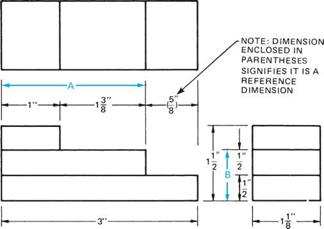
The conventional method of dimensioning is illustrated by Figure 4.21. In this method, the overall dimensions of length, width, and height are given. Dimensions A and B are not given because they are easily found by adding the given dimensions. If dimensions A and/or B were given, they would be identified as reference dimensions. A reference dimension is obtained by adding and/or subtracting other dimensions found on the drawing. A reference dimension is used to expedite reading the drawing; however, it is not a necessary dimension. If a part is dimensioned so that the overall sizes are not given, those dimensions that make up the total must be added to find the overall sizes. Fractional or decimal dimensions may be used, but decimal dimensioning is preferred.
|
FIGURE 4.21 ■ Conventional dimensioning (A, B are possible reference dimensions). |
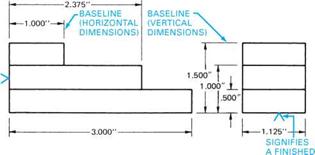
Baseline dimensioning, Figure 4.22, differs from conventional dimensioning in that all dimensions originate from baselines. When baseline dimensioning is used, the dimensions normally are expressed as three-place decimals.
Baselines are object lines that usually represent machined surfaces, as indicated by the symbol. Baselines
may also originate from centerlines.
The advantage of baseline dimensioning is that calculations are not required to find a dimension. It is a method commonly used to dimension precision parts. This method does not give rise to the cumulative error that occurs with conventional dimensioning.
|
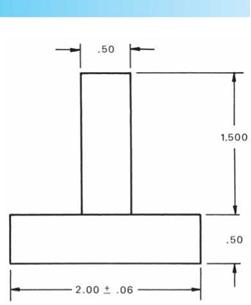
FIGURE 4.23 ■ Reference to a basic size dimension. |
|
SURFACE FIGURE 4.22 ■ Baseline dimensioning. |


 Опубликовано в