Sketching PURPOSE OF SKETCHING
 7 марта, 2014
  Oleg Maloletnikov
 A sketch is a freehand drawing used to describe the shape and size of an object. It is a means of quickly expressing an idea. If necessary, it can later be translated into a finished drawing.
Sketches are often used in place of finished drawings, particularly when time and circumstances do not permit preparation of a finished drawing. In such cases, the sizes of the objects in the sketches are drawn in relative proportion to one another. All of the details and data needed to shape or fabricate the part, including dimensions and notes, are added to the sketch.
BASIC SKETCHING TECHNIQUES
Sketching Lines
Lines are first lightly sketched with short overlapping strokes using a pencil with a fairly sharp point. The lines are then darkened and weighted in accordance with their purpose—in the same manner that lines are shown on a finished drawing. Heavy lines are drawn by dulling (rounding) the point of the pencil and applying enough pressure to produce the line weight desired. Refer to Unit 1, Table 1.1 for the kinds of lines used on a finished drawing.
Sketching Arcs, Circles, and Ellipses
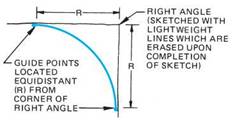
One method for sketching an arc is to first construct a right angle (square corner). To assist in sketching the arc, guide points (R) are located on the legs of the angle to indicate where the curve is to begin and end. The points are then connected with a curved line, Figure 2.1. All unnecessary lines are erased after the sketch is completed.
|
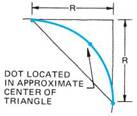
FIGURE 2.2 ■ Using a triangle as a guide for sketching an arc. |
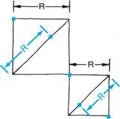
Another method for sketching an arc also begins with a right angle. The two equidistant points (R) are then drawn. These points are connected with a diagonal line so that a triangle is formed. A dot is placed in the center of the triangle, and the arc is drawn so that the curved line connects all three points, Figure 2.2.
|
FIGURE 2.1 ■ Using a right angle as a guide for sketching an arc. |
|
|
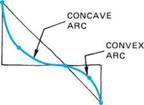
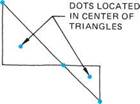
To sketch arcs that change direction and meet at a common point (intersect), the procedure shown in Figure 2.3 is followed. Essentially, it is a matter of developing connecting arcs using a combination of any one of the techniques previously described. Note: The letter R is used to indicate a radius.
|
TRIANGLE METHOD |
|
SECOND STEP - SKETCH INTERSECTING ARCS BY CONNECTING DOTS |
|
FIRST STEP - LAYOUT TRIANGLES AND DOTS |
|
FIRST STEP - LAYOUT RECTANGLES AND POINTS ON DIAGONAL LINES |
To sketch a circle, the same process for sketching an arc is repeated for all quarters of the circle. Either of the two methods described for sketching an arc may be applied to sketching a circle, Figure 2.4.
|
SECOND STEP - SKETCH INTERSECTING ARCS BY CONNECTING POINTS (DOTS) |
|
FIGURE 2.3 ■ Methods for sketching intersecting arcs. |
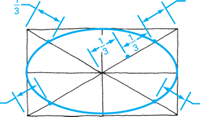
On some views of an orthographic drawing, a circle may appear as an ellipse. An ellipse is sketched by laying out a rectangle with sides equal to the major and minor axes of the ellipse, Figure 2.5. The rectangle is then divided into four equal quarters. The dividing lines represent the major and minor axes of the ellipse. Thereafter, the use of triangles, Figure 2.5(a), or rectangles, Figure 2.5(b), as guides permits sketching the ellipse in a manner similar to that for sketching a circle.
In addition to orthographic sketches, oblique or isometric drawings are often used to present an idea or design of a weldment. The latter two types of drawings are three-dimensional (pictorial) drawings, which may be shown alone or in conjunction with an orthographic drawing.
|
|
|
RIGHT ANGLE SERVES AS A GUIDE FOR SKETCHING EACH QUARTER CIRCLE |
|
TRIANGLE AND DOT IN CENTER SERVES AS GUIDE FOR SKETCHING EACH QUARTER CIRCLE |
|
|
|
TRIANGLE METHOD (4 TRIANGLES) |
|
RIGHT ANGLE METHOD (4 RIGHT ANGLES) |
|
|
|
SQUARE WITH RADIUS LAID OUT ON DIAGONAL SERVES AS GUIDE FOR SKETCHING EACH QUARTER CIRCLE |
|
FIGURE 2.4 ■ Techniques for sketching a circle. |
|
(a) |
|
DOT LOCATED FROM CORNER 1 THE LENGTH OF THE DIAGONAL FOR EACH OF THE FOUR RECTANGLES |
|
(b) |
|
FIGURE 2.5 ■ Methods for sketching an approximate ellipse. |
|
|
|
OF DIAGONAL LINE |
|
FOR THIS QUARTER |
|
SQUARE METHOD (4 SQUARES) |
|
f ^^VIINOR s' AXIS-»~ |
|
|
MAJOR AXIS |
|
EQUAL TO "MAJOR AXIS |
|
EQUAL TO MINOR AXIS |
|
- POINT LOCATED IN CENTER OF TRIANGLE |




 Опубликовано в