COUNTERSUNK AND COUNTERBORED HOLES AND SPOTFACE DIMENSIONS
 24 марта, 2014
  Oleg Maloletnikov
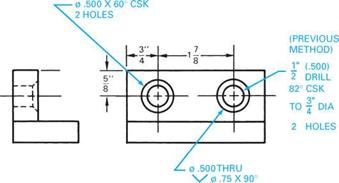
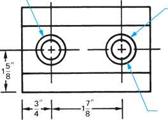
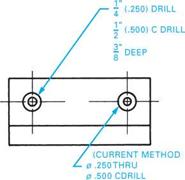
 Several other types of round holes found on weldment fabrication drawings are counterbored, countersunk, spotfaced, and counterdrilled holes. The methods, abbreviations, and symbols used for dimensioning these holes are shown in Figure 4.11, Figure 4.12, Figure 4.13, Figure 4.14, and Figure 4.15.
Note that the abbreviation DP or the symbol for depth is applied to the dimensioning for a counterbored hole. The depth of a spotfaced hole is not given since the primary purpose of the hole is to provide a smooth seating surface. The depth of a countersunk hole is also not given. The major diameter of the countersink is provided.
|
COUNTERSUNK HOLE SYMBOL: 4/ ABBREVIATION: CSK |
|
COUNTERBORED HOLE SYMBOL: l_l ABBREVIATION: CBORE |
FIGURE 4.11 ■ Representing counterbored, countersunk, spotfaced, and counterdrilled holes.
|
SPOTFACED HOLE SYMBOL: l_l (SAME AS FOR A COUNTERBORED HOLE) ABBREVIATION: SF |
|
COUNTERDRILLED HOLE ABBREVIATION: CDRILL |
|
|
|
(PREVIOUS METHOD) _ 1" (.500) 2 DRILL 3" C’BORE |
|
I" deep |
|
HOLES |
|
1 .500 l_l0 .750 |
|
Т.375-2 HOLES (OR 2 PLACES) |
|
|
|
|
|
FIGURE 4.12 ■ Methods for dimensioning a counterbored hole. |
|
(CURRENT METHOD) 0 .500 -0 .750 C’BORE X.375 DP 2 HOLES |
|
~T“ I I ~L. |
5 8 |
|
|
5" |
|
(ANOTHER CURRENT METHOD) |
|
-4" |
|
(CURRENT METHOD) 0 .500
(ANOTHER CURRENT METHOD) |
FIGURE 4.13 ■ Methods for dimensioning a countersunk hole.
|
0 .500 THRU (CURRENT “0 .750 SF METHOD) V 2 HOLES |
|
(.500) DRILL THRU DIA SPOTFACE |
|
2 3 4 2 HOLES |
|
NOTE: SINCE NO DEPTH IS INDICATED, THE SYMBOL IMPLIES A SPOTFACED HOLE |
|
|
|
(PREVIOUS METHOD) |
|
21 " I 2 |
|
(ANOTHER CURRENT METHOD) 0.500 THRU |_|0.750 2 HOLES |
|
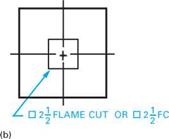
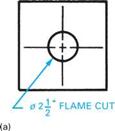
FIGURE 4.16 ■ Methods for dimensioning flame cut holes. |
|
|
|
(PREVIOUS METHOD) |
|
.375 DP (OR f.375) |
|
FIGURE 4.15 ■ Methods for dimensioning a counter drilled hole. |
|
— |
Vrf |
|
|
FIGURE 4.14 ■ Methods for dimensioning a spotfaced hole. |
|
|
Another hole designation found on a weldment drawing is flame cut. When the hole is to be cut as a round shape, it is dimensioned like a drilled hole, except that the dimension is followed by the words “flame cut” or the abbreviation “FC,” Figure 4.16(a). Note that a flame cut hole is usually a large size (1 inch or larger) and is not as precise as a drilled hole. Therefore, its size is usually dimensioned using common fractions rather than decimals. Flame cutting of square holes may also be specified on a print. In such cases, the symbol for square □ may be used, Figure 4.16(b). Note that flame cut sizes are nominal (approximate).


 Опубликовано в