Welds with Filler Metal Addition
 11 июня, 2014
  admin
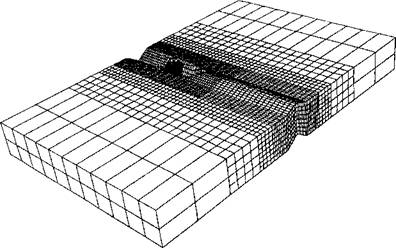
admin Two test cases, of butt welds, have been analyzed on the same mesh structure, shown in Figure 3-17. The characteristics of this mesh are that the liquid metal in the weld pool is excluded and the weld bead can be seen on the plate after the weld pool to account for the added filler material.
In the first test case, the base metal is aluminum which has a high thermal diffusivity and the second is steel which has a low thermal diffusivity. The surface of the weld pool is prescribed at the melting temperatures of the base metals. Both surfaces of the weld joints have been prepared with V grooves. Welds are designed for one pass on each face. The weld pool surface was measured experimentally. First a high pressure gas jet was used to blow the liquid metal out of the weld pool “exactly” when the arc was turned off. Then the weld pool surface was measured directly.
|
Figure 3-17: The FEM mesh is built on a Eulerian frame. The finest mesh is in the front of the weld pool. The element sizes after the weld pool can be changed in analyses, so that more or less material is included, from [14]. |
The Eulerian frame is created on a mesh 218mm long, 165mm wide and 19mm thick. The welding speed was 6mm/s. The length of the weld pool was 32.5mm. The center of the pool was 1 0mm from the leading edge. The maximum pool width was 15mm. The deepest point was 10.1mm. The thickness of the frame is the same as the plate in the real weld, but the length and the width follow that of the sample. The length and the width of the real weld are unknown. Nevertheless, the sample piece cut from the welded plate is assumed to be in steady state. The parameter a was chosen as cp /к = 1.76 x 10⁴ s/m2.
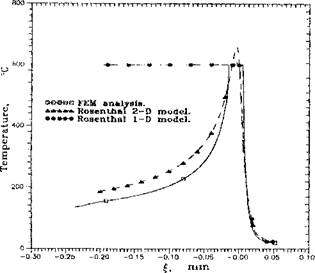
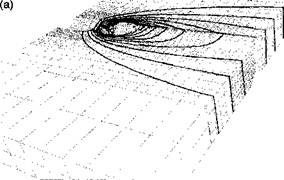
Figure 3-18 shows the computed isothermal contours. Gu et al [14] compares the FEM 3-dimensional steady state analysis with Rosenthal’s 1-dimensional and 2-dimensional analytical model, Figure 3-19.
|
TEMPERATURE °С A = 54.8 G = 333 В = 101 H = 380 c = 148 I = 426 D = 194 J = 472
Figure 3-18: The isothermal contours in the steady state of an arc weld on aluminum plate, computed by a transformed Eulerian formulation. Because of high diffusivity the density of the mesh around the weld pool could be lower than that for steel, (a) Whole mesh; (b) mesh cut along the weld path, from [14]. |
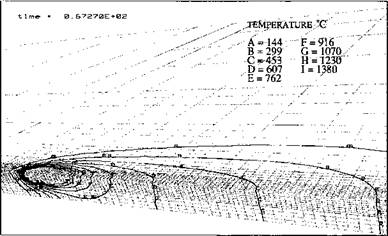
The second test was performed a low carbon steel plate, Figure 320. The weld speed was 1.5 mm/s. Estimated heat input per unit - length was 1.5 kJ/mm. The diffusivity of steel is smaller than that of aluminum. Thus, for the same welding speed, the Eulerian domain for steel can be smaller than that for aluminum. However, the mesh around the weld pool should be finer in order to describe the sharper gradient. The main purpose of this analysis was to compare the results of a transformed Eulerian formulation with that of a time marching Lagrangian formulation.
To assess the efficiency, the same problem was analyzed using a Lagrangian formulation, Figure 3-21. Fifty-five time steps were taken to reach a relatively stable steady-state temperature field near
|
the weld pool. The same value of a was used, a =10 5 s/m2. The meshes for both analyses consisted of about 12000 elements.
Figure 3-19: Comparison of thermal cycles in steady state of weld on aluminum. Note that the 1-dimensional and 2-dimensional analytical solutions were calculated by Rosenthal’s model. Since the 1-dimensional model uses a sectional source and the 2-dimensional model uses a circular through-thickness source, both energy inputs are higher than in reality, from [14]. |
Comparing Figures 3-20 and 3-21, we can find the difference in the contours on the symmetric plane along the weld path. The contours in Figure 3-21 distribute evenly through the thickness after the weld pool. It is apparent that the filler material plays an important part in this difference.
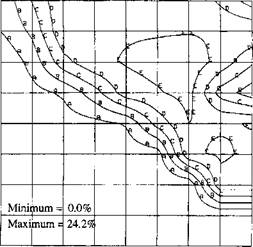
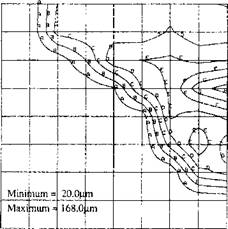
Since the thermal cycle under the second weld pool is different, the microstructure is expected to be different. From the method of Khoral [23], the thermal analysis is coupled to the microstructure analysis. The results are shown in Figures 3-23 and 3-24.
Since the method is valid only in the HAZ, those contours inside the weld pool (contour G, Figure 3-12) have no meaning. Along the weld pool, there is a very thin layer of large grains. As expected, this thin layer becomes much thicker in the bay area. More important the fast cooling rate and high hardenability caused by the large grain size in the bay area tend to cause more bainite and martensite to form, which causes the area to be harder and possibly more brittle.
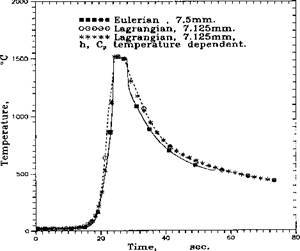
Figure 3-22 compares the thermal history of points on the top surface parallel to the weld path. Because of the differences in the meshes used in the two formulations, the nodal positions are not identical.
|
|
|
(b)
A=144 B=299 C=453 D=607 E=762 F=916 G=1070 H=1230 1=1380 Figure 3-20: The isothermal contours in the steady state of an arc weld on low carbon steel, computed by a transformed Eularian formulation. Because of low diffusivity, the density of the mesh around the weld pool should be higher, especially around the first half of the weld pool, (a) Whole mesh; (b) mesh cut along the weld path, from [14]. |
|
Figure 3-21: The isothermal contours computed by the Lagrangian formulation. The contours represent the solution in 55 time steps, 67 s after striking the weld torch. The velocity and diffusivity used were the same as those used for Figure 319. Note that without the addition of filler material the temperature varies less in the thickness direction after the pool passes, from [14]. |
|
Figure 3-22: Comparison of thermal cycles at a point near the weld pool between the transformed Eulerian formulation and the Lagrangian formulation in steady state. The weld is on low carbon steel. The millimeters indicate the distances from the weld pool. |
|
Contour Values: A = 2.42%; В = 4.83%; С = 7.25%; D = 9.66%; E = 12.1%; F = 14.5% Figure 3-23: Bainite contours in a cross-section, where the austenite transformation is complete |
|
Contour Values (цш): A = 25.8; В = 41.5; С = 57.3; D = 73.0; E = 88.8; F = 105.0; G = 120.0; H = 136.0 Figure 3-24: Grain size contours in a cross-section, where the temperature has cooled to under 200 °С in the HAZ. The grain size is sensitive to the time the austenite phase spends above the dissolution temperature for NbC and VC precipitates. |
A steady state analysis for arc welding with a transformed Eulerian formulation, compared to the usual Lagrangian formulation, has the advantages of low computing cost and high resolution. The model also allows filler material to be added during welding. The test cases indicate that a reasonable accuracy could be achieved with the boundary conditions used. The model can also serve as a good predictor for a full non-linear solver. The thermal cycle of a material point was obtained by traversing geometry space along a flow line and mapping values into the time dimension. The thermal histories obtained can be used to analyze the stress and microstructure in the neighborhood of the weld pool.
Correctness of heat input, i. e., the incoming heat distribution, is critical for the analysis inside the HAZ. It can be expected that different shapes of the heat source will result in different temperature contours, microstructures, as well as strain and stress distributions in the HAZ.



 Опубликовано в