THREAD DIMENSIONS
 1 апреля, 2014
  Oleg Maloletnikov
 |
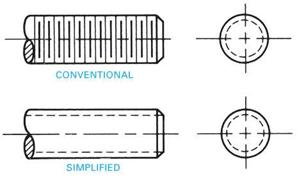
FIGURE 4.17 ■ External thread symbols. |
Weldments very often include threaded parts. Standard thread symbols are used on prints to represent threaded parts. Figure 4.17 shows how external threads are represented. Internal threads (tapped holes) are represented by the symbols shown in Figure 4.18.
|
FIGURE 4.18 ■ Internal thread symbols. |
An internal thread can be shown in a section view (cutaway view) by either of the symbols given in Figure 4.19.
|
SIMPLIFIED |
|
YZZZZZZZZZZ VZZZZZZZZZ22 CONVENTIONAL |
|
FIGURE 4.19 ■ Internal thread symbols for sections. |
|
|
|
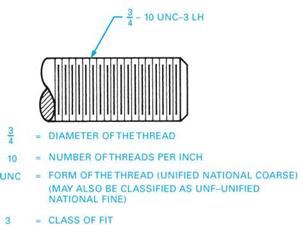
FIGURE 4.20 ■ Elements of a thread specification. |
Both internal and external threads are dimensioned using a leader followed by the thread specification, Figure 4.20. Note that the elements of the thread specification are also defined in the figure. When the thread is a left-handed thread, LH is added following the class of fit specification. In all other cases, the thread is considered to be a righthanded thread. Formerly, the common V-thread forms were identified as National Coarse (NC) or National Fine (NF). With the inclusion of these thread forms in the metric system, they are more often identified as Unified National Coarse (UNC) and Unified National Fine (UNF).
|
LH = DIRECTION OF THREAD (LEFT HAND) |
When a thread class of fit is specified, it is shown in a sequence as illustrated in Figure 4.20. There are three classes of fit that are commonly used. Class I for a loose fit, Class II for a standard fit (as is used for commercially available bolts and nuts), and Class III for a more precise and tighter fit.


 Опубликовано в