OTHER TERMS COMMONLY USED IN DIMENSIONING
 10 апреля, 2014
  Oleg Maloletnikov
 Basic size refers to the base size of a part to which a tolerance value is applied. For example, in Figure 4.23, the basic size dimension is 2.00 with a tolerance of ± .06.
Actual size refers to the size of the part when measured.
Nominal size refers to a dimension that represents an approximate size. It is used for general identification of a size, such as for identifying pipe, pipe fittings, and lumber. Limits of size refers to dimensions that indicate the upper (maximum) limit and the lower (minimum) limit to which the size of a part can be made. Limits may be shown in several ways. Examples follow:
2.50 upper limit
2.37 lower limit
(lower limit) 2.37 - 2.50 (upper limit)
■ Call out refers to identification of each of the parts on an assembly drawing by means of numbers assigned to the parts.
■ The numbers are referenced to a bill of materials to obtain the information needed to produce each part.
DUAL DIMENSIONING
Dual dimensioning refers to the application of both U. S. Customary and metric units (usually in millimeters) of measurement on a drawing, Figure 4.24. It is used on drawings to permit the manufacture of parts in either unit of measurement, depending upon their application and/or where they will be marketed.
FIGURE 4.24 ■ Examples of dual dimensioning using the bracket method.
UNIT 4: REVIEW A
Graph paper has been provided at the end of this review for your use.
1. Give two functions of dimensions. 8. What is the meaning of tolerance as applied to
dimensions?
2. List two ways a dimension can be expressed in U. S. Customary units.
3. How is a precision dimension usually expressed?
4. a. Show by a simple sketch the difference between a bevel and a chamfer.
b. For welding purposes, is a distinction made between a chamfer and a bevel?
c. Which term is commonly used for both?
5. Show two ways in which the given illustrations might be dimensioned. Apply the dimensions to the illustrations.
9. Sketch three methods of dimensioning a radius or arc on a print.
10. What are the maximum and minimum sizes for the dimensions shown in the table?
|
Dimension |
Tolerance |
Maximum |
Minimum |
|
|
a. |
8" |
±1Лб" |
||
|
b. |
Т/зг |
±364" |
||
|
c. |
6' 1178" |
±3/б" |
||
|
d. |
8.902" |
±.003" |
||
|
e. |
1.002" |
±.005" |
||
|
f. |
° 2 8 |
±5' |
||
|
g. |
105° |
±2° |
11. What is the linear length shown on a print for the dimensions given, when drawn to the scale size specified?
|
|
|
|
6. Indicate three items of information that might be found in the dimensioning of a drilled hole using a leader.
|
|
|
Dimension |
Scale |
Size |
|
|
a. |
8" |
1/4" = 1" |
|
|
b. |
18' 6" |
1/8" = 1' |
|
|
c. |
21/1б" |
2" = 1" |
|
|
d. |
23/64" |
3" = 1" |
12. Which of the thread symbols below represent internal threads and which represent external threads?
|
|
7. Identify the type of hole represented by each sketch. Add the dimensions that must be applied to each.
|
|
|
|
|
|
13. List the information that is signified by the following thread specification:
3/4-10UNC-LH
14. Explain the difference between the conventional method of dimensioning and the baseline method of dimensioning.
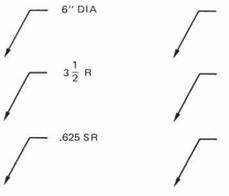
17. Apply the preferred practice of dimensioning to the leaders shown on the right.
|
|
18. Explain what is meant by the term “call out.!
15. What kind of dimensioning is illustrated in the
sketch below?
|
|
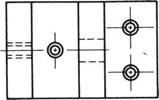
16. a. Apply appropriate dimensions to the
different types of holes shown in the part below. Assume any necessary sizes.
b. Apply the dimension lines required for locating the holes.
c. Identify the types of holes found in the part.
d. Explain the significance of the v symbol shown on the front view.
|
|
19. Refer to the “Roller Support” drawing on page 34 and call out the appropriate items shown on the drawing.
20. Explain the difference between the terms “actual size” and “nominal size.”
21. Explain the significance of the following dimensions:
a. ——1.75—— b. ——8.37 8.50——
165
a.
b.
22. With reference to dimensioning, explain the difference between the terms “clearance” and “allowance.”
|
34 ■ Blueprint Reading for Welders |
|
UNIT 4: REVIEW B |
|
Refer to the drawing, Roller Support, page 34. |
|
1. What is the name of the object? |
|
16. Which line represents surface in the front view? |
|
2. How many are required? |
|
17. Which line represents line © in the top view? 18. How thick is the upright plate? 19. Which line represents surface © in the top view? |
|
3. What type of material is used? 4. What is the overall length of the object? 5. Name the views shown. 6. In which view is the width dimensioned? 7. In which view is an angular dimension used? |
|
20. Which line represents corner in the top view? |
|
21. a. Identify the surface or surfaces to be finished. |
|
b. Sketch the symbol used. |
|
8. How many hidden lines are shown? |
|
9. What is the size of distance (A? |
|
22. Which dimension would be identified as a reference dimension? |
|
10. What is the size of distance CB? |
|
23. Give the location dimensions for the large hole. |
|
11. What is the size of distance © |
|
24. What is the specified tolerance for the angular dimension? |
|
12. How many holes are there in the completed order? |
|
25. Identify the hole that can be a nominal size. |
|
13. How are the holes to be made? |
|
26. What is the common fractional size of the hole to be drilled? |
|
14. How is the largest hole made? |
|
27. List the location demensions for: a. Drilled hole____________________ |
|
15. Where is a decimal fraction dimension found on the drawing? |
|
b. Punched hole. |
|
6" |
|
36 ■ Blueprint Reading for Welders |
|
к |
.500 DRILLTHRU PLACES
|
BEARING SUPPORT BRACKET
|
|
COMPANY NAME |


 Опубликовано в